GF Communion Bread
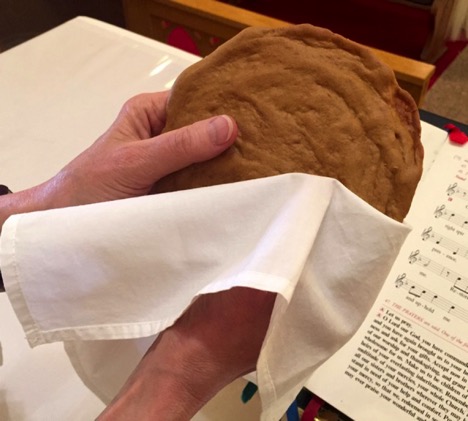
Gluten-Free Communion Bread
Original recipe by Reverend Allison R. Cobb
This recipe is pure brilliance. The problem with most gluten-free bread is the freezing/thawing process. Re-heating and eating it warm gives the best texture - it's not as dry and crumbly. However, re-heating is not always possible during a church service - unless one has installed an under-altar microwave. DING! "Come, for the meal is ready."
Pastor Allison's gluten-free "wonder bread" survives the freezing/thawing process amazingly well thanks to molasses and honey. These two ingredients act as humectants - meaning they help retain moisture. We've had excellent results with bread spending four weeks in the freezer. Being able to bake and store ahead is a huge time saver.
This bread has become standard communion bread at St. Stephen's Lutheran, ELCA, Rogersville.
For the first time in the assembly's history, Peggy made this bread to provide an entirely gluten-free communion to the attendees.
Feeding & Equipping Leaders”
East Central Synod of Wisconsin ELCA
Synod Assembly 2018
East Central Synod of Wisconsin ELCA Synod Assembly 2019 will be offering this gluten-free bread again for their worship service!
In an effort to increase awareness and expand the knowledge-base, GIG of ECW created The Gluten-Free Communion Guide.
The purpose of this guide is to give congregations the necessary tools to safely make, prepare, and distribute gluten-free hosts to their gluten-free members.
If you are making this bread for gluten-free members of your congregation, it is important that you read this guide.
(including this recipe)

The same rules apply to gluten and gluten-free foods - they must be kept apart.
Even though a recipe may use gluten-free ingredients, the food must be appropriately prepared, so it remains gluten-free. If you are making meals for a gluten-free guest, you must be mindful of gluten cross-contact.”
If you are making this recipe for a gluten-free guest, please read our Guide to Gluten Cross-Contact.
Ingredients:
4 large eggs
2 Tbsp Olive Oil
1 Tbsp + 1 tsp Honey
1 Tbsp + 1 tsp Molasses
½ cup water
1 ½ cups Pamela’s Bread Mix – firmly packed (very important to pack)
½ tsp salt
½ tsp gluten-free baking soda (Bob’s Red Mill Baking Soda)
Yield: 8 - 6” rounds (Each round serves about 20 people)
Directions: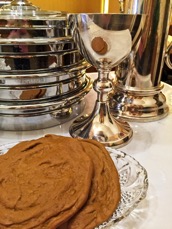
Line cookie sheet with parchment paper. [Use a dessert plate (about 6” diameter) as a template to draw four circles on the parchment paper.]
Whisk eggs in large bowl. Add and whisk with eggs the olive oil, honey, molasses and water.
Sift dry ingredients together (I use a strainer over a bowl). Add to wet ingredients a quarter at a time. Whisk well after each addition. [Can use a stand mixer to mix ingredient for about 3 minutes].
Spoon 8 equal amounts of batter onto each circle. Spread to about ¼ inch thickness. The dough will rise slightly when baking. (they will not spread while baking – desired size is about 6 inches across)
Bake 14 minutes (may have to add 1 more minute if not done). When done use a spatula to transfer the rounds to a wire rack or a cookie sheet lined with three layers of paper towel.
Wrap cooled rounds individually in plastic wrap. Place 3-4 wrapped rounds in large baggie. Put a piece of paper inside the baggie with date of baking on it.
Store in refrigerator for 1-2 days or freeze until ready to use. If possible, set out for an hour or so before using.
(Note: We created a cardboard circle pattern so bakers could draw eight circles on the parchment paper for size).

Spaghetti Sauce
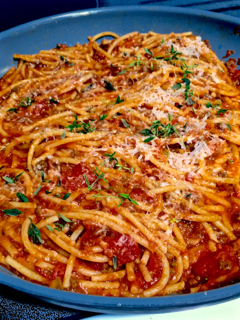
Al’s Spaghetti Sauce
FYI - If you make this recipe to save money and/or time - it will do neither. It will give you the satisfaction of making a great homemade product. Truly a labor of love.
Ingredients:
2 - 28oz cans Dei Fratelli Chopped Italian Tomatoes
1 - 28oz can Dei Fratelli Diced Tomatoes
2 - 15oz cans Dei Fratelli Tomato Sauce
1 - 12oz can Everyday Essentials Tomato Paste
1 - Medium Sized fresh tomato (optional - had one on hand)
2 - Cups Cherry Tomatoes - halved (optional - had some on hand)
1 - Large (or 2 Medium) White Onion - diced
1 - 8oz package of Mushrooms - diced
2 to 3 - Medium sized Zucchinis
2 to 3 - Medium sized Yellow Squash
2 - Medium sized carrots - peeled and fine grated.
Minced garlic (you decide how much)
Penzey’s Dried Oregano
Fresh Thyme (stripped from stem)
Fresh Basil (several leaves fine chopped)
Salt & Pepper
Extra Virgin Olive Oil
2 - lbs Ground Chuck.
The ingredients used above will fill a 7QT pot. Scale your batch accordingly. We freeze measured amounts of sauce in a container - enough for 3-4 servings.
Directions:
Place a 7QT pot on medium heat. Add 2 tablespoons of olive oil to pot. Add carrot, 1/2 of diced onion, zucchini, squash, 1/3 of diced mushrooms, and garlic. Season with salt, pepper, & oregano. Stir.
Sauté until veggies are tender (about 5 - 10 minutes). You might have to add more EVOO during sauté time. Onions will start caramelize. Season with salt & pepper to taste.
Add about a teaspoon of fresh thyme and tablespoon of fresh basil.
Add all tomato products and 1/3 of diced mushrooms to pot. Using an immersion blender, blend the sauce to a texture of your liking. Reduce heat to a simmer and cover with a screen and stir often. The goal is to reduce the water content and concentrate the tomato mixture. This process will take 2 to 3 (or more) hours. Place a teaspoon of the sauce on a plate to see how much liquid spreads out from the edges. I don’t like much water in my sauce, so there’s very little. Season to taste with salt and pepper after it’s done reducing. Salting too much before reduction will also concentrate the salt. Add a sprinkle of dried oregano and more fresh thyme if you like. Stir
While tomato/veggie mixture is reducing, brown the ground chuck.
In another pan sauté the remaining diced onions, remaining diced mushrooms, and some garlic until soft. Salt & Pepper to taste.
Add ground chuck. Salt and pepper to taste. Sprinkle of dried oregano. Break up and stir. Drain excess grease. If you are freezing the entire batch - allow to cool before adding to sauce. If you plan to use the sauce right away - add meat to sauce if it’s reduced to your liking.
Cool before freezer packaging. Fill sink with enough cold water ice to reach 1/2 up the sauce pot when placed into sink. Stir every few minutes.
Baked Alaskan Cod
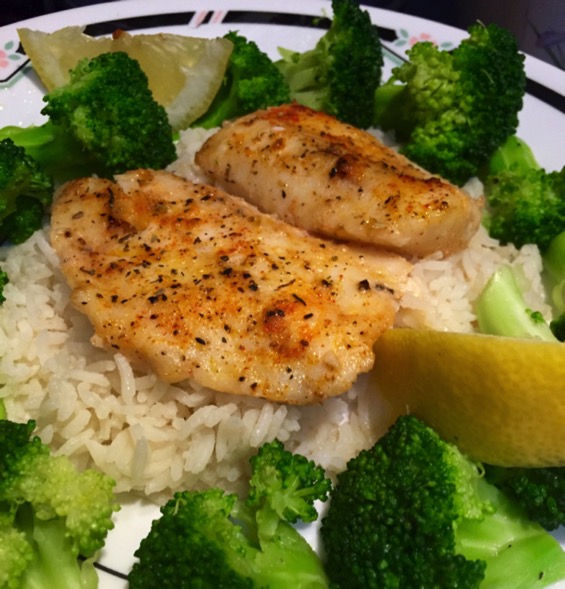
Baked Alaskan Cod
Ingredients:
Wild Caught Alaskan Cod, thawed, cut in 4" to 5" pieces
1/2 stick of butter, melted
5 to 6 lemon slices
1/2 187ml bottle White Zinfandel wine
1/2 medium white onion, sliced
1 to 2 tablespoons minced garlic
Olive Oil
Salt & Pepper
Granulated garlic (Penzey's)
Granulated onion (Penzey's)
Smoked paprika (Penzey's)
Tuscan Sunset (Penzey's) (optional)
Directions:
Preheat oven to 350.
Place lemon & onion slices, and minced garlic in bottom of 9 x 13 glass pan.
Pour in 1/2 bottle of wine and melted butter.
Season mixture with pepper, and a pinch of salt.
Drizzle each side of cod with olive oil. Season each side of cod with salt, pepper, granulated garlic, granulated onion, smoked paprika, and a sprinkle of Tuscan Sunset.
Place seasoned fish in pan and cover with foil and place in oven.
After 30 minutes, uncover fish and return for another 10 - 15 minutes. Fish will flake apart.
Spoon liquid over the top of fish and squeeze of fresh lemon after plating. The liquid is also great poured over rice
Grain-Free Pizza Crust
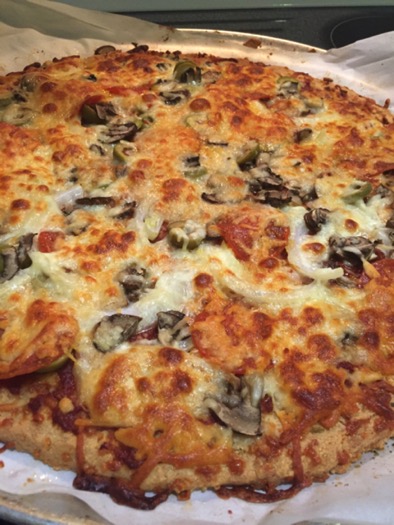
Wheat Belly Pizza Crust
Original recipe by Wheat Belly - Dr. William Davis
After trying this recipe only once - it has become a favorite. Warning: this pizza is very filling. You’ll want to eat more, but you’ll be too full.
When using any flours/grains, nuts, seeds, etc - make sure they labeled gluten-free. Gluten contamination of these products are very likely if they’re not produced in a dedicated facility.
To learn more about this, see Grain-Free for the Gluten-Free
Ingredients:
1 1/2 cups shredded mozzarella cheese
1 1/4 cups GF almond flour (Honeyville) or ground almonds
1/4 cup GF garbanzo bean (chickpea) flour (Bob’s Red Mill GF) or GF coconut flour
1/4 cup GF ground golden fax seeds (Bob’s Red Mill GF)
1 teaspoon granulated onion powder (Penzey’s)
1/2 teaspoon granulated garlic powder (Penzey’s)
1/2 teaspoon salt
1/4 Pizza Seasoning (Penzey’s) - optional
2 eggs
1/4 cup extra virgin olive oil
1/2 cup of water
This recipe makes one 14” (if not bigger) crust when pressed to 3/8” thick.

If you like a thinner crust, consider making two crusts instead of one depending on your pan size.
Directions:
Preheat oven to 350F.
In a food process or chopper, chop cheese into smaller rice sized pieces.
Place all ingredients into large bowl and mix thoroughly. Stand mixer works great.
Place parchment paper on large (16”) pizza pan or cookie sheet.
Scoop dough on parchment paper and roughly shape into a circle. Use spatula or oiled hands to do this.
Cover dough with parchment paper. You can use a rolling pin, or another large flat pan (pizza pan works perfectly) to roll or press dough out flat. Depending on your tastes - aim for 1/4” or 3/8” thick. This recipe makes at least one 14” crust when pressed to 3/8” thick.
TIP: If you have a smaller pan, place only half the dough if you want a thinner crust (less than 3/8” thick).
Carefully peel off parchment paper and adjust shape or edge with oiled hands.
Bake for 20 minutes or more. Crust will start to brown. The cheese chunks will turn a golden brown.
Remove from oven and apply desired toppings.
Return to oven for another 15 minutes or until topping cheese is melted.
Aneh's Awesome Turkey
Submitted by Al (with slight modifications)
Shortly after going gluten-free [in 2003], Peggy & I took a gluten-free holiday cooking class from food scientist extraordinaire Aneh Mundi. She went through an entire holiday feast. Lots of great recipes. To this day, we still use Aneh's blend of seasonings when we make turkey and turkey broth. We keep a jar of it on our “Wheel-O-Spices”.
Ingredients:
1 fresh or frozen turkey 10 to 13 lbs
2 tbs Black ground pepper (Penzey's)
2 tbs Salt
2 tbs dried basil (Penzey's)
1 tbs white pepper (Penzey's)
1 tbs ground coriander (Penzey's)
2 tsb dried orange peel (Penzey's)
Extra virgin olive oil (optional)
1 medium/large onion, rough chopped
1 celery stalk, rough chopped
¼ lemon, chopped (optional)
Note: Before you start working with the turkey, set some of the seasoning aside for use in the gravy or for future turkeys. It has the potential to get contaminated with raw turkey.
Directions:
Remove giblets from turkey and set aside for broth.
Combine seasonings in a bowl – mix well.
Place turkey in cooking bag (optional)
Drizzle & rub olive oil over entire turkey.
Sprinkle and rub seasoning mix inside, outside, and under the skin.
Stuff cavity with onion, celery, and lemon.
Place bagged turkey in a roasting pan
Roast turkey at 325 for 3 to 3 ½ hours – until juices run clear or internal breast temperature reaches 161 or 162. Remove turkey from the oven, let it rest. The temperature will continue rise. Carry-over cooking will take you to the food safe number of 165.
Drain drippings from bag into large bowl. Strain into large pan for making gravy.
Gravy Ingredients:
Turkey drippings
4 – 8 tbs Gluten-Free Sweet Rice Flour (Bob's Red Mill)
A few pinches of Aneh's Turkey Seasoning
Gravy directions:
Heat drippings in pan on medium-high heat.
Add a few pinches of turkey seasoning to taste.
Make a slurry 3 – 4 tbs of Sweet Rice Flour and a teaspoon or so of cold water. Mix until no lumps.
Whisk in slurry as drippings begin to heat up and start to boil. This when gravy will start to thicken. Keep adding slurry until gravy is the consistency you desire.
Croutons & Stuffing
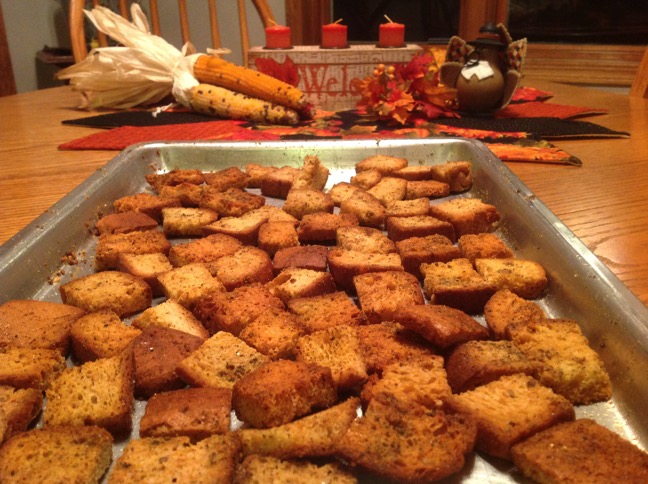
Gluten-Free Croutons
Special thanks to my Sister-In-Law Debi for showing Peggy how to make these for our Thanksgiving feast last year. They are great just for snacking on.
Ingredients:
1 to 1 ½ loaves of GF bread, cut or torn in desired size. For stuffing, pieces might be smaller vs larger for snacking/dipping.
GF Granulated Garlic
GF Granulated Onion
GF Ground Sage
GF Paprika (optional)
Salt
Olive Oil
Directions:
Preheat oven to 300.
Spread bread pieces on sided baking sheet. Allow to dry for at least 2 days – 3 to 4 is preferable.
Drizzle olive oil lightly over the bread and mix well.
Season to taste. Mix well after each seasoning.
Bake for 10 to 20 minutes or until GBDC (Golden, Brown, Delicious & Crunchy). Stir every 5 minutes.
Remove from oven and spread out to cool.
Note: Airbake pans won't brown as quickly. Try not to eat them all before you make your stuffing.
Tip: Instead of throwing out the heels or unused pieces of GF bread, put them in the freezer to be used later.
Gluten-Free Stuffing
Ingredients:
1 loaf gluten-free bread (or the croutons above)
3 tablespoons butter, unsalted
2 carrots, peeled and small diced
2 celery stalks, small diced
2 cloves garlic, minced
1 onion, peeled and small diced
1/2 teaspoon salt
1/4 teaspoon ground black pepper
2 cups gluten-free chicken broth
1 1/2 tablespoon fresh sage, chopped
1 tablespoon fresh thyme, chopped
Directions:
Preheat oven to 325°F. Slice the bread into 1-inch cubes and spread out on a baking sheet.
Place in the oven and toast for 25 minutes, flipping/tossing once during toasting. (Skip this step If you are using the croutons you made from above recipe)
Melt butter in a large and deep cast iron or oven-safe skillet. If you do not have a large and deep oven proof skillet, you can prep the stuffing in a skillet and transfer to a 9" x 13" baking dish before finishing off in the oven. To the butter, add carrots, celery, garlic, onion, salt, and pepper. Sauté on medium heat for 15 minutes until the onions and carrots are soft and tender. If the onions or garlic start to brown, reduce heat to medium-low.
Once the carrots are tender, add chicken broth, sage, and thyme and stir to combine. Simmer for 5 minutes. Taste, and add additional salt or pepper, if needed. Next, add the toasted bread cubes/croutons and gently toss to combine. Transfer to the oven and bake for 25 minutes. Serve warm. Makes 6-8 servings.
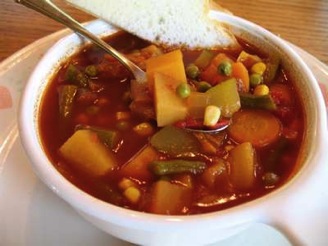
Tomato Soup
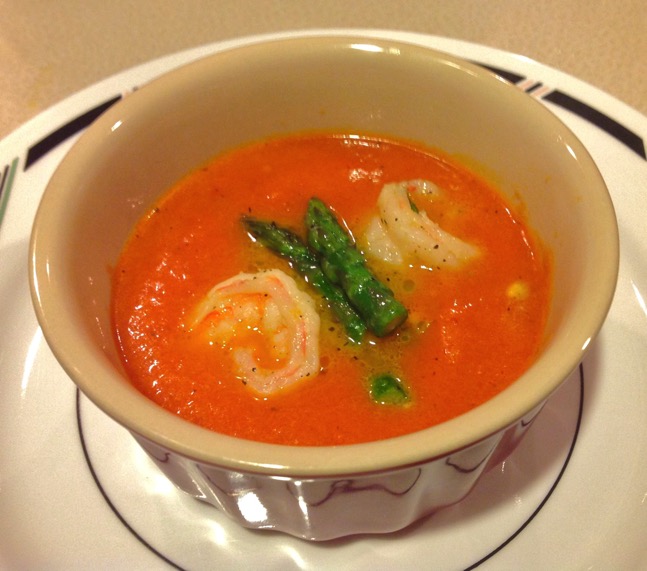
Gluten-Free Tomato Soup
Peggy came home from work and was hungry tomato soup and grilled cheese sandwiches. However, there was a small snag in this plan; we didn't have any tomato soup.
As many of you know, most tomato soup is not gluten-free. Since I'm not a huge fan of tomato soup, this fact was not a hardship for me when I went gluten-free.
It was late and neither one of us wanted to run down to the store to get a can. I said, "It is tomato soup, it can't be that difficult to make, I'll just make some [gluten-free of course]".
So I hop on the iPad and Peg grabs her laptop. In few minutes we a have few recipes that are quick and easy [and good and gluten-free!]. While I worked on the soup, Peg made the grilled cheese sandwiches. We make a great team!
Ingredients:
1 tablespoon olive oil
1 tablespoon butter
1 medium white onion, coarsely chopped
2 cans diced tomatoes [with juice]
1 1/2 cups gluten-free chicken broth or water (Kitchen Basics, Swanson’s, Pacific, Imagine)
2 Bay leaves
1/3 cup skim milk (we didn't have any heavy cream)
Salt & fresh ground pepper
Directions:
Place medium sized pot [enough to hold all the ingredients] on medium heat. Add butter and olive oil. Add onion, season with salt and freshly ground black pepper. Sauté until onion is soft and just start to caramelize [about 10 - 15 minutes].
Add tomatoes and juice to the pan and stir to crush dices of tomatoes. Add the broth [or water] and bay leaves and bring to a simmer. Simmer until tomatoes pieces begin to break down, about 10 minutes.
Remove from heat, remove bay leaves, and allow soup to cool slightly. Carefully spoon some of the soup in blender/food processor [you may have to do this in batches]. Blend until smooth. Return soup to the stove over low heat and stir in cream.
Taste for seasoning adjustments.
Even though I'm not a fan of tomato soup, I have to say, I did like it and will make this again.
If you're looking for a kicked up grilled cheese sandwich, check out our Pesto Tomato Grilled Cheese Sandwich.
Sauteed shrimp and steamed asparagus garnish the soup.
Until the next good eats - cook well and be well.
Al
Seasoned Rice with Chorizo
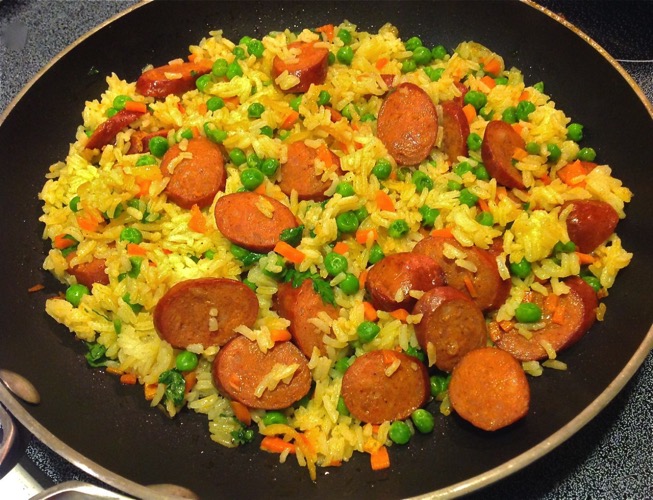
Seasoned Rice with Chorizo
Most meals around our house are like an episode of The Food Network's Iron Chef. We never know what we're going to have too far in-advance.
It usually starts with "You know we have ________ in the fridge yet".
However, in this case, I was digging through the freezer looking for a protein. Chicken - nah, just had it. Beef - nope, need to give it a rest. Pork chops - mmm nah-uh, just not feelin' it.
Tonight's secret ingredient is...Chorizo sausage! Allez Cuisine!
Now...what to do with it? This is what I came up with...
Ingredients:
1 cup rice (Lundberg)
2 cups of gluten-free chicken broth (Kitchen Basics, Swanson’s, Pacific, Imagine)
1 tbsp butter
1 tsp salt
Penzey's Forward seasoning
Klemment's gluten-free chorizo sausage - sliced
1 or 2 carrots, finely diced
1/2 cup diced white onion
Salt & Pepper
Granulated garlic
Olive Oil
Green Peas (frozen, but fresh if you've got 'em)
Fresh Parsley - roughly chopped
Directions:
Combine rice, broth, butter, salt and seasoning in a pot. Bring to boil and stir once. Cover and simmer for 20 minutes.
Add olive oil and carrots to large pan saute on med-high heat until carrots start to soften. Add a bit of water to help steam carrots.
Add onion and stir
Season with salt, pepper, granulated garlic
Add sausage to pan and stir.
Lower heat once everything is heated thru
Add rice to pan when it's finished cooking.
Mix ingredients well.
Add chopped fresh parsley right at the end.
Until the next good eats - cook well and be well.
Al
Seasoned Vegetable Medley with Shrimp
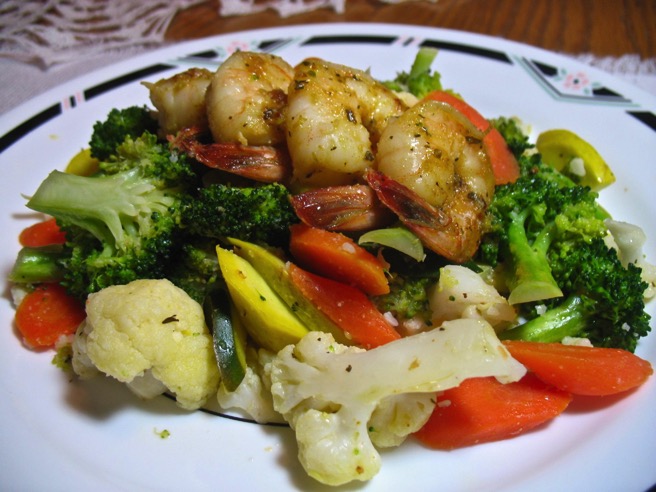
Seasoned Vegetable Medley with Sauteed Shrimp
This veggie dish has become a favorite in our house. I make a large batch so I can have left overs. I like to make an omelet with these veggies.
This dish is all about timing. You don't want the shrimp to get done first and get cold. You don't want to leave the veggies in the pan waiting for the shrimp to get done.
The veggies will cook at different rates; you can help adjust for that by paying attention to piece size. Cauliflower and carrots tends to take longer to cook due to their density. I like to have a bit larger pieces of cauliflower, so those go in first. I try to keep the carrot slices about 1/4" thick. Broccoli, squash, and zucchini cook pretty quickly - keep a close eye on them so they don't turn to mush.
I tend to like my veggies on the crunchy side, so adjust the cooking times to suit your tastes.
Veggie Ingredients:
Cauliflower
Carrots
Broccoli
Yellow Squash
Zucchini
1/2 lemon - quartered
Grass Fed Butter
Olive Oil
Granulated garlic (Penzey's)
Granulated onion (Penzey's)
Tuscan Sunset (Penzey's)
Salt
Fresh ground pepper
Shrimp Ingredients:
1 lb raw, peeled, devained, and cleaned shrimp
Olive Oil
Granulated garlic (Penzey's)
Granulated onion (Penzey's)
Forward (Penzey's) Adds a bit of heat and spice
Salt & fresh ground pepper
Directions:
Place shrimp on a plate.
Season shrimp with garlic, onion, Foward, salt & pepper. Drizzle with olive oil. Mix well.
Set aside while working on the veggies
Cut veggies into bite sized pieces. Place large saute pan on medium high heat.
Add olive oil to pan. Add cauliflower. Stir.
Squeeze lemon pieces over cauliflower and add lemon pieces in the pan.
Add splashes of water to create steam. When water has evaporated, add a bit more. Do this through out the entire cooking process.
Lightly season with granulated garlic, onion, Tuscan Sunset, salt and pepper.
Stir. Allow cauliflower to saute/steam for about 2 - 3 minutes.
Heat another saute pan for shrimp.
Add carrots - lightly season - stir - add a bit more water - stir for 3 - 4 minutes.
Add a bit of olive oil and shrimp to other saute pan. Stir.
Add broccoli - lightly season - stir - add a bit more water - stir for 1 - 2 minutes.
Stir shrimp
Add squash and zucchini - lightly season - stir - add a bit more water - stir for 1 - 2 minutes.
Remove shrimp pan from heat. Shrimp should be pink.
Add 2 to 3 tablespoons of butter to veggies. Stir while melting.
Taste and add additional seasoning if needed.
Remove the lemon pieces.
Plate the veggies, top with shrimp.
Until the next good eats - cook well and be well.
Al
Lemon Garlic Chicken over Cauliflower Mash
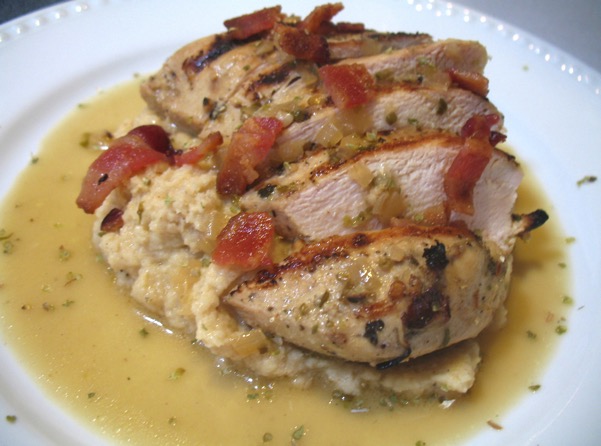
Grilled Lemon Garlic Chicken Breast
over Roasted Garlic Cauliflower Mash
Facebook is not all time-wasting games, people-sharing-more-stuff-than-we-really-wanted-to-know...it can be a really useful tool. Seriously...
I believe one of my Paleo Diet friends posted the low-carb Lemon Garlic Shrimp over Cauliflower Mash recipe from Nancy at SheCooksHeCleans.net. Like a good husband, I asked Peggy to Pin it for me so I could make it for her. The ironic thing...it's just the opposite in our house...I cook and Peg cleans...just the way I like it.
I did make the shrimp & cauliflower and we both loved it! We had tried mashed cauliflower in the past, but we weren't impressed [at least with that particular recipe]. This recipe on the other hand...is a keeper!
In my adaptation of Nancy's recipe, I am simply replacing the shrimp with chicken and removing the lemon juice and red pepper flakes from the sauce. Actually the chicken you see was actually grilled the night before. Peggy is not a fan of reheated meat, but she had no problems cleaning her lunch plate.
If you like garlic, you're going to love this dish! It calls for fourteen to sixteen cloves. You'll need a way to peel them quickly; watch this video, it really works: http://vimeo.com/29605182
Oh yeah, word of caution, don't plan on going out after eating this, you're a walking Garlic Weapon of Mass Destruction. This gives a whole new meaning to "chemical weapon".
Ingredients
Marinade:
Zest of 1 lemon
2 cloves garlic, minced
3-4 tablespoons extra-virgin olive oil
1/2 teaspoon dried oregano
1 pound (3 or 4) chicken breasts
Cauliflower Mash:
1 head of cauliflower, cut into even medium to large sized florets
6-8 cloves garlic, peeled
Extra-virgin olive oil
Kosher salt and freshly ground black pepper, to taste
Butter
1/2 cup Parmesan cheese, freshly grated
Half and half or cream / Milk or broth, optional use if needed to correct consistency
Lemon Garlic Chicken:
Marinated Chicken (from above)
6 cloves garlic, minced
2 slices bacon
2 tablespoons butter
1/2 cup white wine, or gluten-free chicken broth
1/2 sweet onion, minced
Pinch or two of dried oregano
Kosher salt and freshly ground black pepper, to taste
2 tablespoons fresh oregano, chopped
Directions
1. Mix all the ingredients of marinade in a bowl large enough for all the chicken pieces. Place chicken in the bowl and make sure each one gets well coated. Cover and place in refrigerator for 1 - 4 hours.
2. Preheat oven to 400 and fire up your favorite grill (gas or charcoal). Place cauliflower and garlic cloves in foiled shallow pan [sided cookie sheet or jelly roll pan]. Drizzle enough olive oil to coat the pan/foil and the vegetables. Season to taste with salt and pepper. Cover loosely with foil and roast for 15 min. Remove foil and carefully stir vegetables so they don't stick and so they brown evenly. Uncover and roast for another 15 – 20 minutes or until cauliflower and garlic are soft and lightly browned. Remove from oven.
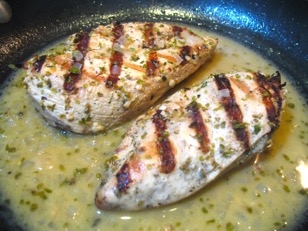
3. As the cauliflower is roasting, get your grill grates cleaned and prepped. I like to heat my gas grill to about 500-600° to carbonize anything that might be sticking on the grates. Brush the grates with a grill brush to remove any carbonized food particles then clean with several layers of paper towel that was liberally coated with vegetable oil. This clean the grates, but it also creates a non-stick surface. Close grill cover and allow internal temp to rise back up to 500+
4. Place chicken breasts on the grill. Grill until meat is firm and juices run clear (or internal temperature reaches 165°). Remove from grill, cover allow to rest and keep warm.
5. Place cauliflower & garlic with a couple tablespoons of butter in a food processor and puree. Add parmesan cheese and mix well. The cauliflower should be a mashed potato or grits consistency (fairly thick, not runny). Add a touch cream or broth if it's too thick. Place in a heat-proof bowl and keep warm.
6. In a sauté pan, cook the bacon until crisp. Remove bacon set aside on paper towels. When cool, chop into small pieces. Set aside.
7. Add two tablespoons of butter to the bacon drippings and melt on medium heat. Add onion and cook until softened. Add minced garlic, and oregano – sauté for a minute. Stir in wine/broth. Cook until liquid is reduced by half (only a few minutes). Salt & pepper to taste.
Note: I also had left over bacon, so I did not have bacon drippings to help create a sauce. So, in order to re-heat the chicken and make a sauce, in a pan melt 2 tablespoons of butter, a splash of olive oil and sauté some minced onion and garlic. After onions soften, add some gluten-free chicken stock (1/4 - 1/2 cup?). Cover just the chicken with a small cover and allowed the sauce to reduce & slightly thicken. Near the end of cooking, add some dried oregano. If I had some white wine, I would've used that instead of chicken stock.
8. Slice chicken and place over mashed cauliflower, spoon sauce over the top. Garnish with chopped bacon.
Until the next good eats - cook well and be well.
Al
Lemon and Herb Roasted Chicken
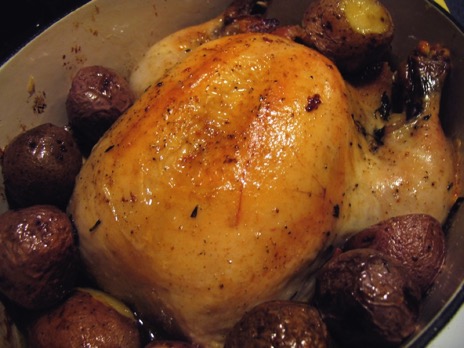
This was part of a very fallish Saturday night dinner. What you don't see is the roasted squash.
In the 20 years that Peg and I have been married, we've never roasted a chicken. We've done turkeys countless times, but not chickens. Why? Don't know. 99% of our chicken comes in the form of boneless-skinless breasts...it's quick, it's easy, it's versatile. Well, things have changed.
Some days it's like Iron Chef Kitchen Stadium around our house - I never know what is going to turn up. Friday night I helped put away groceries and came across a whole chicken.
Me: "A whole chicken?!"
Peg: "Yeah, I think we need to roast a chicken to go along with that squash."
Me: "Are you going to make Beer Can Chicken?"
Peg: "I would but we don't have any gluten-free beer in cans".
Now I'm sure we could've worked out the logistics of making a gluten-free beer can chicken if we put our minds to it, but we had a zillion other things to do around the house on Saturday. As I was recovering from my yard raking & mowing induced myocardial infarction, I decided to consult one of my friends about a roasted chicken recipe. It didn't take long before he suggested a recipe from Tyler Florence of Food Network fame.
I decided on Tyler's recipe because 1) there is only a handful of ingredients 2) there is only a handful of steps 3) it was going to taste great! I don't like following recipes in the first place, and it's even worse when it's long and drawn out...and often times organized weirdly...and often times makes me swear at it [maybe I'm the one that's organized weirdly, but that's whole 'nother post...].
Some people like gourmet-type foods with an ingredient list as long as your arm and a set of directions that is as thick as War and Peace. I have neither the patience nor the time for that! I'm a simple guy, that likes simple, but great tasting gluten-free food. Tyler's recipe is a perfect example of how you can take simple ingredients and make amazing food! Yes, "the whole is greater than the sum of its parts".
This recipe is a keeper. In our house we call it "Company Food" [food we'd serve to guests].
Ingredients:
1 whole chicken (organic, free-range if you like)
1 lemon, quartered
1 head of garlic, halved
1/4 bunch of fresh rosemary, thyme and parsley, roughly chopped
1/4 cup olive oil
1 1/2 pounds of red potatoes (all about the same size)
Salt & Pepper
Directions:
Preheat oven to 400
Tyler's recipe [and many others] calls for rinsing the chicken, however the USDA suggests that rinsing can spread bacteria thus increasing cross contamination risks. When cooked properly (internal temp >165) any bacteria on the chicken will be destroyed.
Season the cavity with salt & pepper - after removing the bag of "goodies" found inside.
Stuff the herbs, garlic & lemon inside the cavity.
Tie the legs together and place into roasting pan. I used our dutch oven, it was a snug fit so I didn't tie the legs.
Season outside liberally with salt & pepper and drizzle the olive oil over the entire chicken.
Toss in the potatoes around the chicken.
Roast for 1 to 1 1/2 hours. Remember to baste the chicken with the drippings every 20 minutes.
Check internal temp by inserting an instant read thermometer into thickest part of of thigh - it should read 165 degrees.
Remove from pan and let rest for 10 minutes before carving.
Enjoy!
Note: We saved the pan drippings, added the carcass (and the head of garlic) back to the dutch oven and covered it with tap water. Let this come to a boil for 10-15 minutes and strained the liquid gold into a large bowl or measuring cup. After cooling, place in fridge. The fat will rise to the top to be skimmed off later. This will be the base for some killer chicken soup!
Until the next good eats...
Al
Pesto Tomato Grilled Cheese Sandwich
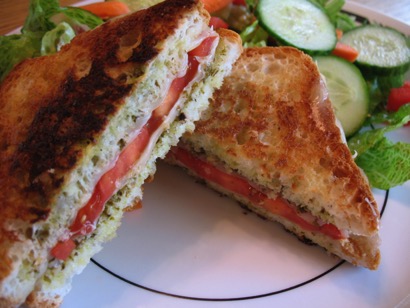
Don't get me wrong, I really like leftovers for lunch, and have them quite often, but sometimes it's nice to make something fresh.
Since we had a couple of tomatoes from the farmers market just begging to be used, we decided to turn our Pesto Grilled Cheese Sandwich into a Pesto Tomato Grilled Cheese Sandwich.
I best get back to the vacation fun of cleaning the garage...
Pesto Tomato Grilled Cheese Sandwich
Ingredients:
2 slices of GF Bread (Udi's is shown here)
Basil Pesto (homemade is best, but Classico Basil Pesto shown here)
2 slices of Provolone cheese
1 slice of tomato
Olive Oil
Directions:
Heat pan or griddle to medium heat.
Drizzle olive oil on one side of each slice of bread. This side will be placed directly on the heat.
Spread pesto on the non-oiled side of each slice.
Lay down one slice of cheese on top of pesto
Lay down the tomato slice.
Lay down the last slice of cheese. This encases the tomato in an envelope of cheese.
Cover with remaining slice of bread. Remember Pesto side toward the cheese/oiled side on top.
Place sandwich on pan and cover. Covering will help the cheese melt.
Check after 1 - 2 minutes - make sure it's not burning. Flip when GBD (golden, brown & delicious)
Do the same to the next side.
I'll let you decide how best to slice your sandwich. Personally, I think diagonal cuts taste far better. :-)
Since GF bread slices tend to be smaller, I made 2 sandwiches.
If you're looking for gluten-free tomato soup to go with this, check out our Gluten-Free Tomato Soup!
Until the next good eats...
Al
Cold Pasta Salad
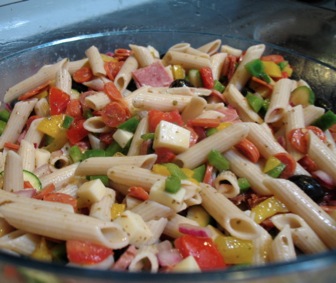
For those of us without kids, we are going to squeeze every last bit out of summer before it slinks into fall.
Summer time = cookouts and family gatherings
Cookouts and family gatherings = cold pasta salads!
Any cookout worth its salt has a cold pasta salad present. Years ago, a relative of Peg's brought this [non-gluten-free] pasta salad to a summer family event. Peg said that I'd really like it - it was tangy, zesty and a bit spicy. Yup - sounds like right up my alley, but I couldn't touch it.
Until today...we made this salad for our group's annual cookout! Nothing is off-limits at this cookout!
Gluten?!? We don't need no stinkin' gluten!
Jovial Foods was kind enough to send us some samples of their pasta [my sole intent was making a rightous cold pasta salad]. I think we accomplished that mission!
Salad Ingredients:
1 lb Jovial Gluten-Free Penne Rigate Pasta.
1 Small Onion
1 Green Pepper
1 Yellow Pepper
1 Small Zuchinni
½ lb of Mozzerella cheese (cubed)
½ lb of Hormel Pepperoni Slices (chopped)
¼ lb Hillshire Farms Hard Salami Slices – chopped.
3 Stalks Celery (sliced)
3 Fresh tomatoes (sliced or chunked)
1 can pitted black olives (sliced)
Dressing Ingredients:
1 ½ teaspoon salt
¾ teaspoon white pepper
½ cup of canola oil
¼ cup of olive oil
½ cup Heinz White Vinegar
2 ½ teaspoon Penzey's Orgeno
½ teaspoon Penzey's Pizza Seasoning
¼ teaspoon Penzey's Garlic Powder
Mix dressing ingredients, veggies & meat chill for at least 2 hours. Do not mix in cheese.
Make gluten-free pasta several hours before eating. Allow to cool (room temp).
Mix pasta, dressing with veggies and meat, and cheese together. Chill until needed.
Product notes:
Gluten-free pastas have a tendancy to harden when cold. Jovial's Penne has a much better texture [softer] when chilled overnight.
Jovial's GF products are certified by the Gluten-Free Certification Organization.
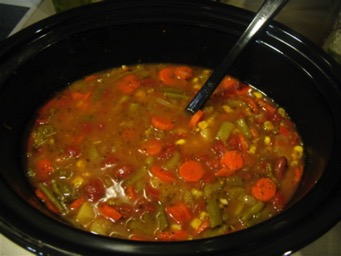
Vegetable Beef End of Summer Soup
Ingredients:
1 - 2 pounds stew meat (not pre-seasoned or pre-marinaded)
1 - 2 tablespoons olive oil
1 32 oz carton GF beef stock (Kitchen Basics, Swanson’s, Pacific, Imagine)
1 48 oz bottle V8 Juice
2 - 3 cups cubed fresh rutabagas
2 - 3 cups peeled & sliced fresh carrots
2 - 3 cups chopped fresh green beans
1 medium onion chopped
2 cups chopped zucchini
2 ears cooked fresh corn cut off the cob or frozen
3/4 cups of frozen peas
3 cups chopped cabbage
2 chopped Roma tomatoes
1 Bay leaf
Salt & Pepper to taste
optional: 1 packet of HerbOx beef bouillon
optional: 1 small 5.5oz can of tomato juice
Directions:
Add olive oil to your soup pot or dutch oven and brown stew meat.
Add beef stock and V8 juice to pot and stir.
Add carrots and rutabagas. Let simmer for 10 minutes.
Add all the rest of the veggies and bay leaf.
Stir and simmer covered pot for about 3 hrs.
Rinse the bottle of V8 and add water to pot [about 1-2 cups].
Peg Notes:
The amounts of veggies can be adjusted to your tastes. I added the additional HerbOx and tomato juice because I felt there was more veggies than liquid. I didn't want to loose flavor as I added liquid, so I used the HerbOx
Minestrone Soup
This recipe is adapted from Living Without Summer 2005 issue.
It's one of our favorites and gets rave reviews from all who've tried - gluten-free or otherwise.
We save it for the fall/winter when it is cold and yucky on the outside and warm and yummy on the inside.
Ingredients
1/2 cup extra virgin olive oil
1 tablespoon butter
2 cloves minced garlic
1 large onion - diced
2 medium carrots - sliced
2 stalks celery - sliced
1 medium potato - diced
1 15oz can diced tomatoes
1 small zuchinni
1 tspn oregano
2 tspn salt
4 cups GF chicken broth (Kitchen Basics, Swanson’s, Pacific, Imagine)
1 cup fresh or frozen corn
1 cup fresh or frozen green bean (1 1/2" pieces)
1 15oz can kidney beans - drained & rinsed
1/2 cup chopped fresh basil (optional) or 2 cubes of frozen homemade basil pesto (See Al Notes)
Parmesan cheese (optional)
Add olive oil, butter & garlic to a large soup pot over medium heat. Saute until onion is transparent and soft.
Add celery, carrots, potato. Sauté for another 5 minutes.
Add tomatoes, oregano, salt and chicken broth.
Bring soup up to a simmer. Cover and cook for 15-30 minutes. Veggies should be tender.
Add the corn, green beans, kidney beans, zucchini and simmer for another 15-30 minutes.
Stir in fresh basil or add frozen pesto cubes and allow to melt.
Serve hot and don't eat too much. You could also top with fresh grated Parmesan cheese.
Al Notes
Since we made a double batch, we use both kidney beans and black beans.
In the summer I will make fresh basil pesto. This is usually a Saturday project for me. We have a little farmers market downtown and I'll get several bunches. I'll whiz up a batch and pour it in ice cube trays and freeze it. After about a month of pesto making, we'll have several freezer bags full of pesto cubes we can use for a whole bunch of things...like this soup!
Chicken & Wild Rice Blend with Veggies

The Wild Rice Blend is from Lundberg and has become one of my recent favorite meals. It simple to do, but it takes time for the rice to cook. However it gives you time to do the veggies.
The recipe for this on the bag.
Ingredients
1/2 cup of chopped celery
1 cup of sliced mushrooms
1 small onion
1/4 cup red bell pepper
1/4 cup carrot
1 (or more) cloves of garlic
2 tbs butter or Extra Virgin Olive Oil (I used EVOO).
2-3 tbs of GF soy sauce (GF Teriyaki sauce is used in the original recipe, but we don't like teriyaki sauce)
1 cup of Wild Blend
2 cups of water or GF chicken broth (Kitchen Basics, Swanson’s, Pacific, Imagine)
1 tbs butter (optional - you could use EVOO too)
Salt & Pepper to taste. Just know how salty the broth is before you season.
Directions
Combine rice, liquid & butter/EVOO in pot with tight lid
Bring to boil. Stir once then cover.
Reduce to simmer and cook 50 minutes.
Remove from heat and let stand while covered for 10 minutes.
While rice is cooking prep the veggies. Use you imagination - use colorful veggies!
In a pan, add butter/oil & garlic over medium heat for 2 minutes.
Add onion, celery & carrots and stir. Sauté for 3-4 minutes
Add red bell pepper. Sauté for a couple more minutes.
Add mushrooms & stir.
Add GF teriyaki or soy.
Reduce heat and stir occasionally.
Remove from heat when veggies are tender.
Once the Wild Blend is done, fold in veggie mixture.